Did you realize that the outcome of most any sailing emergency...
will often be determined within those first few seconds or minutes?
Would your sailing crew or partner be ready?
Do you have your "initial action" plan in place...
to deal with the unexpected when it crosses your path...
like a blown hose on a seacock or a fracture in your hull?
Read this excerpt from the soon to be released eBook...
"Sailing Emergencies "Take-Action" Guide"...
to discover some of the techniques you'll want to add...
to your treasure-chest of knowledge for sailing safety.
~~~~~~~~~~~~~~~~~~~~
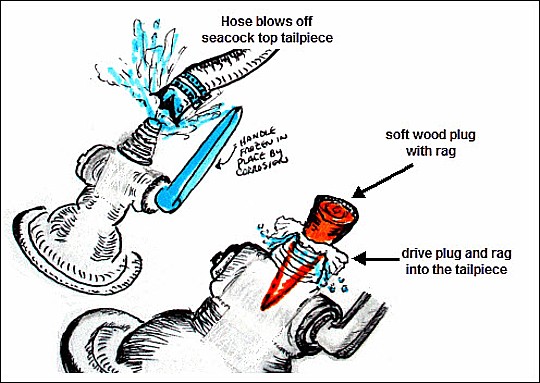
What initial "first line" action will you take if a hose blows off the top of a seacock--and the handle freezes in the open position?
Or all of a sudden you hear a thud in the middle of the night--and water pours in from a crack in your hull. Take action fast, be aggressive, and use the materials you have aboard.
Install this #1 Flooding Tool First
The force of sea water flowing through a hole or fracture will be enormous. Imagine that you turn on a garden hose full force. Now try to drive a wooden plug into the end of the hose with just your hand.
Use a heavy hammer or mallet to drive plugs or patches (see below) into or over a hole or fracture. The heavier the better. In the Coast Guard, we used sledge hammers in live training exercises. Swing a sledge hammer in air--that's easy. Try that with water up to your waist, and it's like slow motion. Heavier gets the job done fast.
Mount your hammer or mallet in an open area, accessible to the crew. Like a fire extinguisher, your hammer must be easy to find day or night, in lighted or unlighted situations--not buried in a sail locker or tool box.
Follow the illustrations and steps below to keep control of any emergency that involves water intrusion into your boat:
How to Plug a Seacock!
1. Practice prevention to avoid emergencies in the future. Exercise seacock handles (move them from the open to closed position several times) at least once a month to prevent corrosion (freezing in place).
Inspect seacock hoses for hardening or cracks. Install new hoses if you suspect weakness or lack of integrity. Inspect and replace corroded or rusted hose clamps.
2. Attach a soft-wood, tapered plug to each seacock. Use soft rags over the point to provide friction and fill cracks or gaps when you drive it in to the seacock tail-piece.
3. Monitor your repair to make sure water pressure doesn't blow the plug out. Keep a hammer or mallet nearby in case you need to drive the plug in further. If necessary, use the next illustration (see "How to Shore Up a Fractured Hull!" below) to strengthen your plug repair further.
--------------------------------------------------------------------------------
How to Shore Up a Fractured Hull!
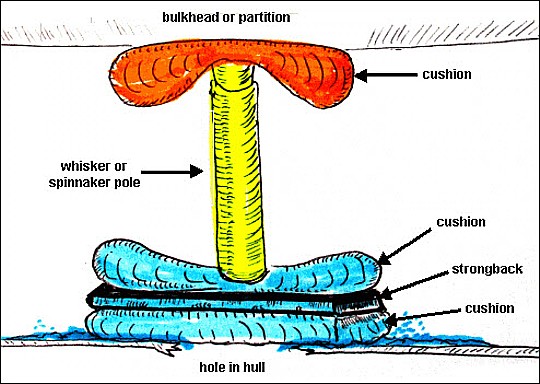
1. Make a "strong-back" over the hole. Any rigid or semi-rigid flat piece of material makes a good strongback. For example: hatch boards, access covers beneath berth cushions, spare plywood, a large clipboard.
Next, build a "strongback sandwich" (see illustration). Jam a cushion or pfd over the hole. Place the strongback over the cushion. Put a second cushion or pfd on top of the strongback.
2. Use a boat-hook, whisker-pole, or spinnaker-pole as a brace. Jam one end of the brace into the top cushion over the strong-back.
3. Hold a second cushion or pfd against the opposite side bulkhead. Jam the other end of your brace into this cushion.
Monitor Your Patch Repair
Assign a crew to monitor the patch to make sure it holds. Boats flex and vibrate underway, even in calm conditions--and that can cause your patch to shift. Water pressure against the patch will be quite high. Add more braces for additional support. Keep a heavy hammer or mallet close by to set your braces into position.
|
Captain John's Sailing Tip |
Captain John
Get Instant Access to 425+ sailing articles, videos, live discussion forums, and FREE eBooks!
Click Here to Join!
Related articles